 |
| Sunflower Temari |
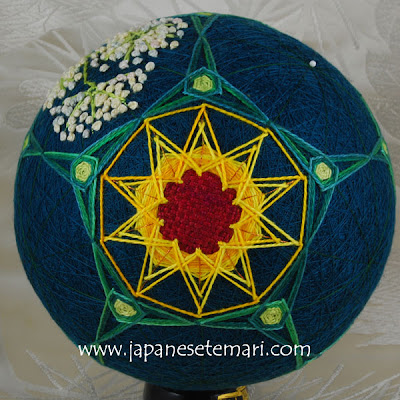
I can't count the number of sunflowers that I've stitched on temari - so many! This is the first one with a woven center. Usually, I fill the center by stitching a lot of French knots or by just stitching around the guidelines (around and around and around from the center outwards). This version is more stylized than the others with having so much open space for the petals. I did a lot of frogging (rip it, rip it) and restitching to experiment and am finally happy with the result. Since I might use this temari for my JTA Level 4 certification one day, I want to make each flower look new and different by combining some traditional temari stitches with some traditional Western surface embroidery stitches and other fiber techniques. So far, so good.
First post on Flower Temari Challenge gives info on making and marking the ball.
Unfortunately, I forgot to take pictures in progress! I have a really nice set up in my office/studio/sewing room. My desk is by a window so I can watch the birds and squirrels gorge themselves at the feeders outside. I have a computer on the desk and a light box with camera set up on a table just to my right. The table is actually and old interior door that sits on top of two filing cabinets. So I can sign on to Netflix, watch an instant download TV show or movie, stitch, snap photos, and make notes on my computer, all within easy reach. I'm in heaven! When I stitched this sunflower, I was so wrapped up in watching Doc Watson on Netflix that I totally forgot about stopping to take pictures. Sorry about that! I know they are a big help. So I've done some extra drawings to replace those photos. I lived in Cornwall, England, for a few years during my wild and impetuous youth so I love the scenery, the villages, and even the characters in Doc Watson. They remind me of some fun but challenging (dirt poor) times.
Back to the sunflower - here's the quick version of what I did. All thread is Caron Watercolors.
1. Woven center: pin a 1.75cm radius paper circle guide to the center of the 10-part pentagon. Outline the circle with inconspicuous thread (stem stitches). Remove paper circle. With #164 Cinnabar, stitch parallel rows of single thread straight across to fill the circle (like a satin stitch shown on Sharon B's site). Next, use the same thread to stitch and weave at right angles to the first stitching. Weave under 2 and over 2.
2. Layered pentagons: pin a 2.0cm radius paper circle guide to the center. Place pins at the edge of the paper circle next to all guidelines. Remove paper circle. Stitch 2 pentagons, layered, with #275 Daffodil (7 rows on each pentagon). Make sure the first pentagon rows cover the edges of the woven center.
3. Herringbone: first add extra guidelines. With copper metallic thread, stitch on top of the original 10-part pentagon guidelines, going under the woven area in the center.
First row herringbone: place guide pins for the outside points of the herringbone 1cm inwards from the end of each guideline (from the edge of the triwing stitching). The inside points of the herringbone begin in the woven center, near the edge. With #275 Daffodil, stitch one row herringbone on each set of guidelines to make a layered herringbone design.
Second row (same thread): stitch 1 row kiku herringbone, placing stitches at inside points under and around the previous row. Place stitches for the outside points very close to the triwings (leave room for one more stitch).
Third row (same thread): stitch around the outside of the flower, connecting the outside points.
That's it! A new sunflower.


