Monday, January 30, 2012

Herringbone stitch for temari

Add support lines to help
place stitches at the outside points.


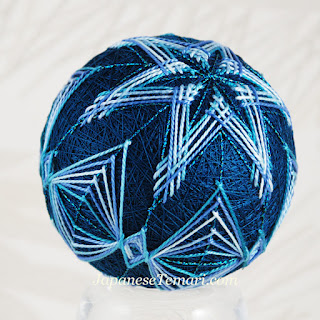
Update - last night I stitched a new temari with this unusual technique of stitching a kiku herringbone at the inside points combined with a wide herringbone at the outside points of the circular motif. I really like the result!


Stitches are placed a little bit apart from each other.
The obi decoration is also
done with herringbone stitching.
In our TemariChallenge Yahoo group, we are making temari with the colors of glass artist Dale Chihuly. Upload a photo to Kuler and let the program select the colors. Here's a picture I took in Tacoma and the colors...


Week 5 stitch for TAST is herringbone! We temari stitchers use this one all the time. Most often it's a kiku herringbone. Sharon challenged us to go beyond what we've done before and try something different. I've never seen it done like this with the outside points made as a wide stitch instead of a sharp point. Needs work to make it neater but I think this will be a keeper.

I added an extra row of blue metallic on top like Sharon's double herringbone, version 2.

15 comments:

  1. Replies
    1. Sure does. I think I'll add guidelines and make the stitches at the outer points even wider. And , going the other way, I'd like to neatly taper the outer points so the points are sharp. I need practice at this one!

      Delete
  2. It is beautiful. Well I had better quit looking at your work and go sew my herringbone, But it is so beautiful, I might just continue to look at you terami a little bit longer/ Kathy http://kathysnest32.wordpress.com/

    ReplyDelete
  3. It never ceases to amaze me how you can take a simple stitch and make something truly magically. Thanks for sharing. Juno

    ReplyDelete
  4. I love your temari. I would like to try it, but I don't know where purchasing such a ball.

    ReplyDelete
    Replies
    1. Oh, you have to make the ball yourself. It's part of the fun!
      http://www.japanesetemari.com/freepatterns/make-a-temari-ball/directions-make-temari.html

      Delete
  5. Thank you all for your nice comments. I have enjoyed looking at everyone's stitching, too.

    ReplyDelete
  6. I'd never seen temari before I joined TAST and it's so clever. Your colours are lovely and the design so carefully stitched. I hadn't thought of doing the stitch in the round - I will have to give it a try...

    I have put a link to your post in my blog post to share with my readers.
    http://silentcompanions.blogspot.com/2012/02/tast-challenge-week-5-herringbone.html

    ReplyDelete
  7. LOVE it!! Beautiful!! Do you make Temari to sell, by any chance?

    ReplyDelete
  8. Thanks! I have lots for sale in my shop. The link is in the sidebar to the right on this page.

    ReplyDelete